Growing turmeric in pots offers several practical benefits, especially for home gardeners and those with limited space. Turmeric is a versatile and hardy plant that thrives in controlled environments, making it ideal for container gardening.
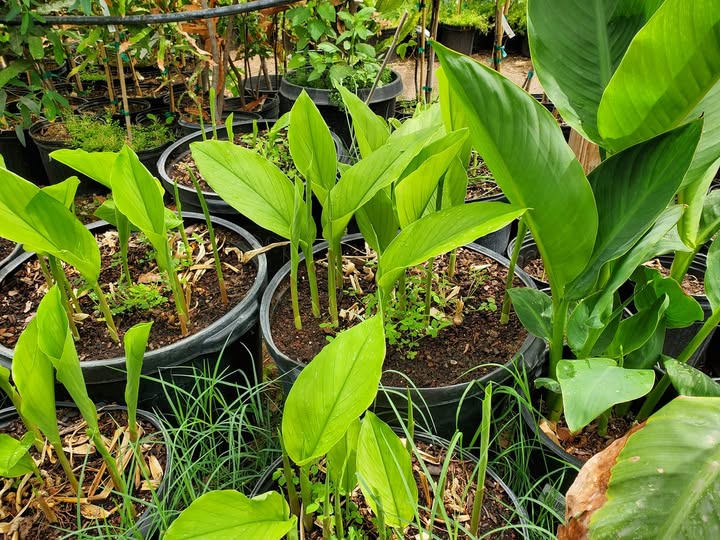
By growing turmeric in containers, you can regulate soil quality, moisture levels, and sunlight exposure, ensuring optimal growth conditions. This method also reduces the risk of pests and diseases commonly found in open gardens, as pots can be moved indoors or to a shaded area when necessary. Additionally, turmeric’s striking green foliage adds a touch of greenery to balconies, patios, or even indoor spaces, serving both an aesthetic and functional purpose.
Another significant advantage is the ease of harvesting and maintenance. Growing turmeric in pots allows you to monitor its progress closely and harvest the rhizomes without disturbing the entire plant. This is especially useful for continuous cultivation, as you can stagger planting times to ensure a year-round supply.
Turmeric’s medicinal properties, including its anti-inflammatory and antioxidant benefits, make it a valuable addition to your kitchen and natural remedy collection. Container gardening also makes it easier to manage growth in climates that may not naturally support turmeric, as you can adjust pot placement to take advantage of seasonal changes.
Growing Turmeric in Containers

Turmeric (Curcuma longa) is a tropical plant known for its vibrant yellow-orange rhizomes, commonly used as a spice and in herbal remedies. Growing turmeric in pots is ideal if you lack garden space or live in a cooler climate. This guide will help you grow turmeric successfully in containers.
1. Understanding Turmeric
- Type: Perennial herb in tropical climates.
- Parts used: Rhizomes (underground stems).
- Growing season: Best planted in spring or early summer.
- Growing time: Requires 8–10 months to mature.
2. Materials Needed
- Turmeric Rhizomes: Available at garden centers or organic stores.
- Container: A pot at least 12–18 inches wide and deep with drainage holes.
- Potting Mix: A mix rich in organic matter. Combine potting soil, compost, and sand for drainage.
- Fertilizer: Organic fertilizer or compost.
- Mulch: Straw, leaves, or wood chips to retain moisture.
- Water source: For consistent watering.
3. Preparing for Planting
Selecting Rhizomes
- Choose plump, healthy rhizomes with multiple “eyes” (small buds).
- Organic store-bought turmeric often works but ensure it hasn’t been treated with growth inhibitors.
Preparing the Pot
- Ensure your pot has good drainage to prevent waterlogging.
- Fill the pot with the prepared potting mix, leaving 2–3 inches of space at the top.
4. Planting Turmeric
- Prepare Rhizomes:
- Cut the rhizomes into 2-inch pieces, ensuring each piece has at least 2–3 buds.
- Plant:
- Lay the rhizomes horizontally about 2–3 inches below the soil surface.
- Cover lightly with soil and water thoroughly.
- Placement:
- Place the pot in a warm, sunny spot. Turmeric needs at least 6–8 hours of indirect sunlight daily.
5. Caring for Your Turmeric Plant
Watering
- Keep the soil consistently moist but not waterlogged.
- Water more frequently during hot weather and less during cooler periods.
Temperature
- Ideal temperature: 68–95°F (20–35°C).
- Protect the plant from frost or extreme cold by moving it indoors during winter.
Fertilizing
- Apply organic fertilizer every 4–6 weeks to encourage growth.
- Add compost or liquid seaweed to boost nutrients.
Mulching
- Mulch the soil surface to retain moisture and suppress weeds.
Pruning
- Remove dead or yellowing leaves to direct energy to the rhizomes.
6. Pest and Disease Management
- Pests: Keep an eye out for aphids or spider mites. Spray with neem oil if necessary.
- Diseases: Avoid waterlogging to prevent root rot. Use a well-draining soil mix and ensure proper ventilation.
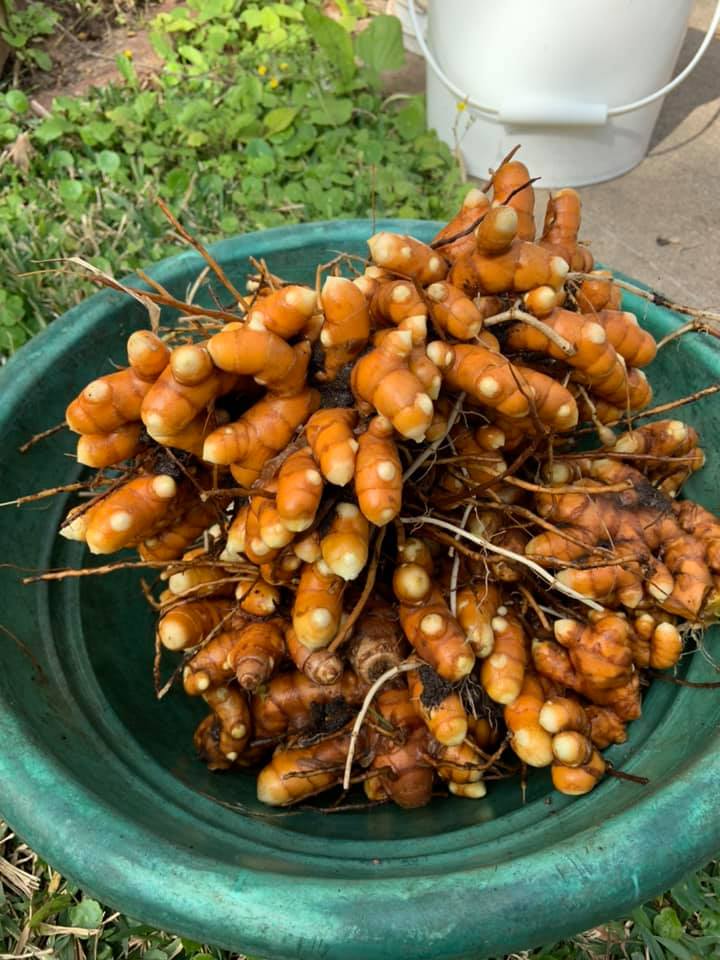
7. Harvesting Turmeric
- When to Harvest:
- 8–10 months after planting, when the leaves and stems turn yellow and begin to dry.
- How to Harvest:
- Dig gently into the soil to remove rhizomes.
- Shake off excess soil and separate them from the plant.
- After Harvesting:
- Save a few rhizomes for replanting next season.
8. Storing and Using Turmeric
Storing
- Wash rhizomes and dry them in a cool, shaded place.
- Store in an airtight container in the refrigerator or a cool, dark pantry.
Using
- Fresh: Grate or slice for teas, curries, or smoothies.
- Dried: Boil, peel, and dry rhizomes in the sun. Grind into powder for long-term use.
9. Troubleshooting Common Problems
Yellow Leaves:
- Overwatering or insufficient nutrients. Adjust watering and fertilize.
Slow Growth:
- Ensure adequate sunlight and warmth.
Small Rhizomes:
- Pot may be too small. Use larger containers for more room to grow.
10. Tips for Success
- Patience: Turmeric grows slowly, so don’t rush the process.
- Indoors in Cold Climates: Grow turmeric indoors with grow lights to mimic tropical conditions.
- Rotate Rhizomes: After a harvest, amend the soil and rotate the rhizomes to prevent nutrient depletion.

FAQs
Yes, turmeric can be grown indoors if provided with adequate light. Use a south-facing window or grow lights to ensure it gets enough brightness.
Carefully dig into the soil and lift the rhizomes without damaging them. Shake off excess soil and wash the rhizomes thoroughly.
Yes, turmeric grows well in containers, as it thrives in confined spaces with proper care. This method is ideal for those with limited gardening space or cooler climates.
Sign up to get our FREE weekly emails
Gardening guides, tips, & videos delivered right to your inbox!